In this post we’re going to look at how you can import multiple files containing multiple sheets with Power Query, even if the data isn’t formatted in an Excel Table. In other words, the worst data layout ever!
The data in these sheets also doesn’t include the date that the data relates to, but thankfully the file name does.
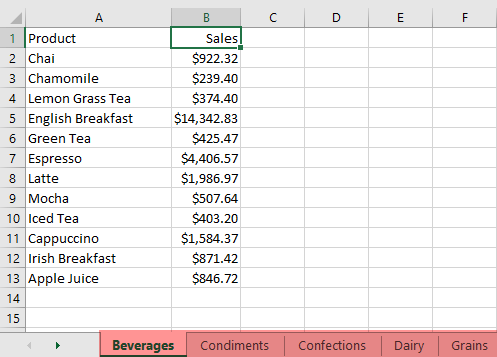
As you can see below, I’ve got three of these terrible files in a folder:

Watch the Video

Download the Files
Enter your email address below to download the sample workbook.
Import Multiple Files Containing Multiple Sheets with Power Query
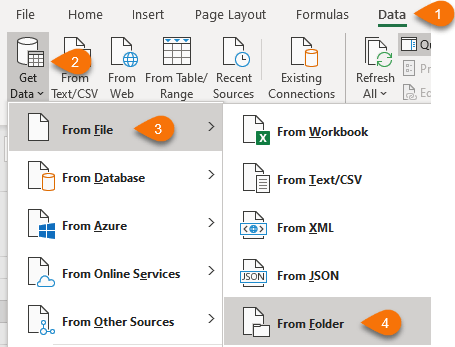
Step 1: Get the data
Data tab > Get Data > From File > From Folder
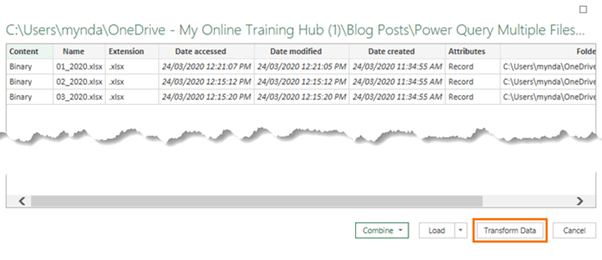
Step 2: Select the folder
Click ok and at the folder screen click Transform Data:
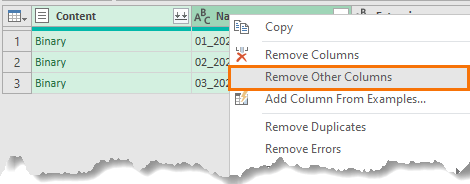
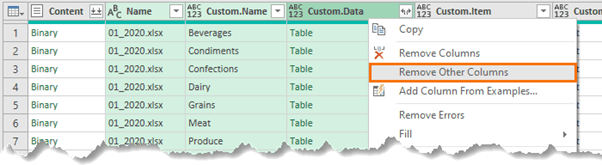
Step 3: Remove Other Columns
Hold SHIFT to select the columns containing the meta data that you want to retain, plus the Content column > right-click > Remove other columns. In this example I want to keep the file name (partially hidden behind the right-click menu in the image below) because it contains the date information for the data in each file:
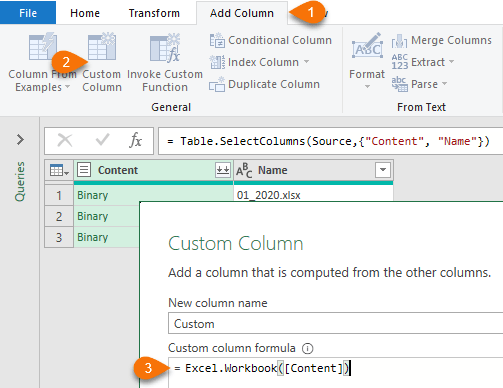
Step 4: Add Custom Column
On the Add Column tab > Custom Column. In the formula field enter the formula shown below:
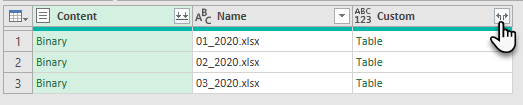
Step 5: Expand the Tables
Click on the double down arrow on the Custom column > click OK:
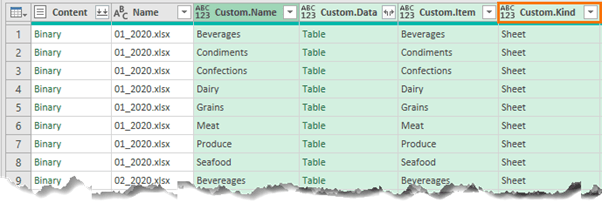
Step 6: Apply Filters
We can now see a list of the objects in the files (sheets, tables, named ranges etc.). If your files contain tables, sheets or named ranges that you don’t want, use the ‘Kind’ column to filter them out. As you can see in the image below, my files don’t contain any unwanted data:
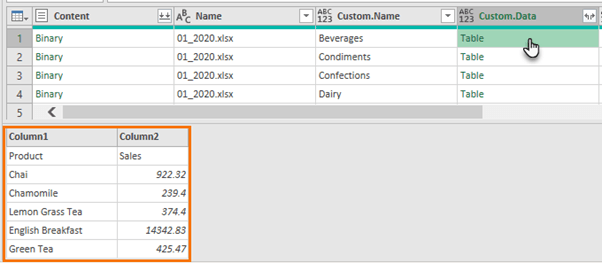
If you click in the white space beside the ‘Table’ in the Custom.Data column, you’ll get a preview of the data in the preview pane at the bottom of the window:
Step 7: Remove Unwanted Columns
Before expanding the individual tables in the Custom.Data column, you should remove columns that you don’t want in your final dataset. Note: you must retain the Custom.Data column at the very least!
I want to keep the file name as this contains the date information and the Custom.Name column as this contains the product category information from the worksheet tab names.
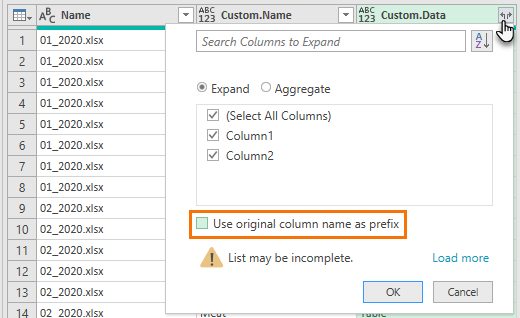
Step 8: Expand Tables
Click on the double arrow on the Custom.Data column and deselect the ‘Use original column name as prefix’ check box before clicking OK:
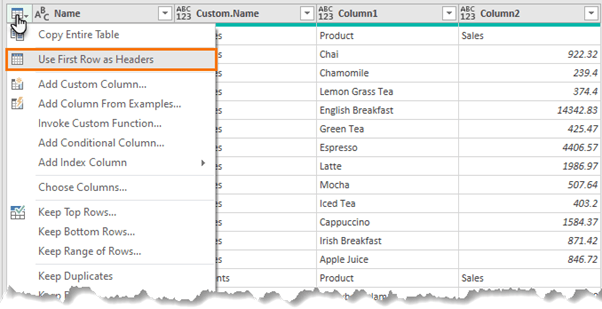
Step 9: Promote Headers
You should now see the data from each file and worksheet in one table.
It’s time to tidy up the headers. The first row contains header labels. To promote them, click the drop down in the top left of the table > Use First Row as Headers:
Step 10: Rename Columns
Rename the first two columns: File Name and Category. Double click the column header to edit.
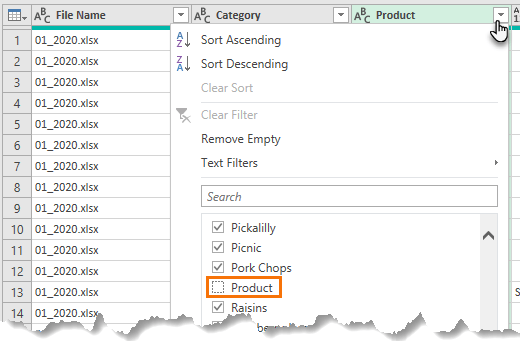
Step 11: Remove Extra Header Rows
The headers from the other sheets are still occupying rows in the data set. Click the Product Column filter button and remove ‘Product’ from the list:
Extracting Dates from File Names
At this point you may be finished. However, I want to extract the date from the file name, so I have a few more steps to go.
Step 12: Extract the Date from the File Name
The Date column contains the file names, so let’s extract the date from the file name and convert it to a proper date.
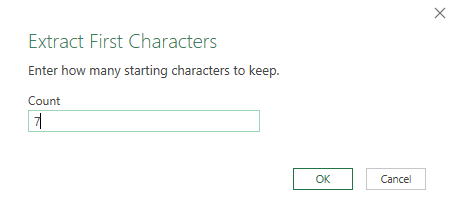
Select the File Name column > Transform tab > Extract > First Characters:
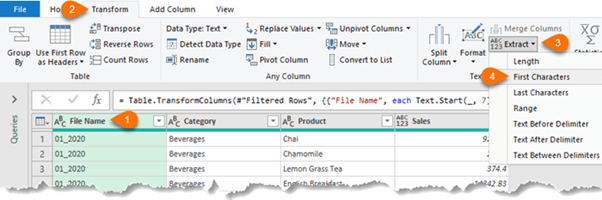
I want to discard the .xlsx and keep the first 7 characters:
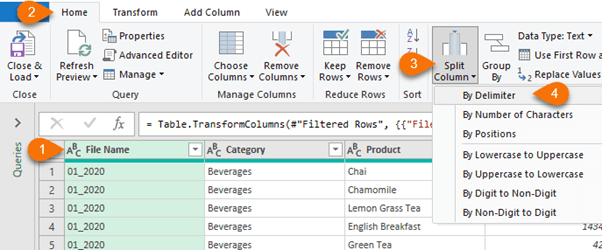
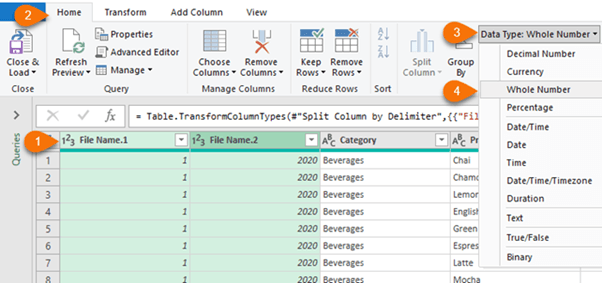
Step 13: Split Month and Year
Now I need to split the month and year into separate columns. Select the File Name column > Home tab > Split Column > By Delimiter:
In the Split Column by Delimiter dialog box choose the following:
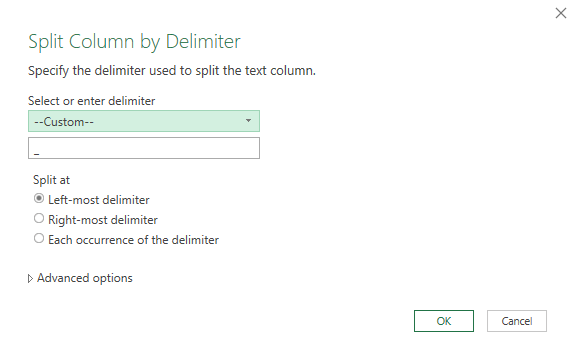
You now have the month in File.Name1 and the year in File.Name.2. Power Query should automatically apply a ‘Changed Type’ step to convert these columns to data type; date and you should see it in the Applied Steps pane. If not, select File.Name.1 and File.Name.2 columns > Home tab > Data Type > Whole Number:
Step 14: Create Date Column
Now we can join the columns back together with a custom column (Add Column > Custom Column), as a date using the #date function. The syntax is:
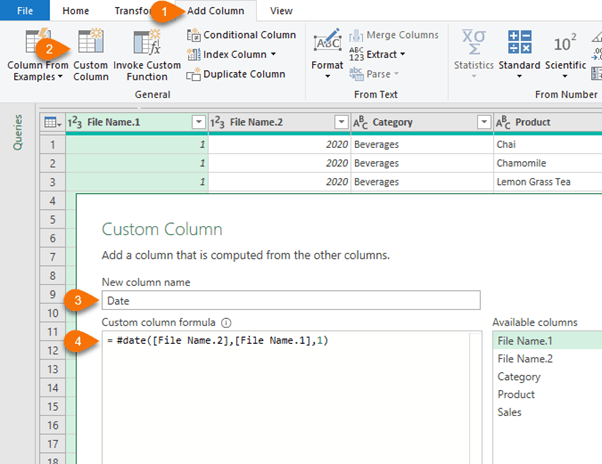
#date( year, month, day)
Notice in the image below that I’ve added 1 for the day value, so all data is as at the first of each month:
Step 15: Remove Columns
Now we can tidy up the columns, deleting File Name.1 and File.Name2 as we don’t need these anymore.
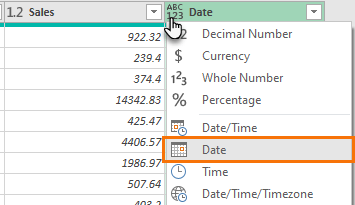
Step 16: Set Data Types
The Sales & Date columns need data types set. Use the drop-down icons to the left of each column header to set the data types:
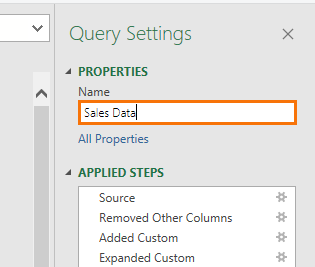
Step 17: Rename Query
Lastly, rename the query in the Query Settings Properties with something useful as this will be the Table name in Excel/Power Pivot.
Now you’re ready to Close & Load:
So, there you have a relatively easy way to import Multiple Files Containing Multiple Sheets with Power Query. There are a lot of steps, but everything is point and click simplicity.
Similar Power Query Scenarios
 |
Get data from one file containing multiple sheets Splitting data over multiple sheets is perhaps one of the worst Excel crimes I see. It’s a crime because it breaks the rule that source data should be in a tabular format. Tabular data is what we need for PivotTables and many functions like SUMIFS, COUNTIFS, INDEX, VLOOKUP etc. However, it’s easily fixed with Power Query. |
 |
Get data from multiple files containing one sheet If you receive your data in separate daily, weekly or monthly files then before you can even begin analyzing the data, you need to consolidate it into one table. |


You are simply the best of them, I am going to camp here and just digest. Thank you
Thanks so much, Eguono!
Great post! You explained it so well.
I encountered another situation that is a bit different from here,
Let’s say I have 2 workbooks (Jan, Feb) and each workbook has 2 worksheets (A, B). Both worksheets have different headers.
How could I create a third workbook which appends data of both sheets A and B from both workbooks?
Thanks.
If they have different headers the you’d need to create two queries, one for each set of headers and then merge the queries together.
Mynda, excellent tutorial. I have successfully set up a Combine Append query however if any of the source Excel sheets are open the query doesnt pull any of their data in, is there a way around this? Our sheets are simple timesheets, and they are open on operatives’ computers 24/7, but we want to be able to pull the real time data in?
Thx
Dan
Hi Dan,
There’s no workaround. The files must be closed for Power Query to get the updates. Perhaps an alternative is to have your operatives fill out an Excel Form that deposits the data in an Excel file that you can then connect to with Power Query.
Mynda
I am glad to be your student
Great to hear, Saheed!
Hi Mynda Treacy! Try to find a way to use PQ Import Folder (In this folder I have 5 .csv-file (logg files from PLC)) I don’t want to combine, I want them seperate sheets. Is this possible? Or do I need to use PQ import fil choose .csv file and repeat it on all .csv-files?
Regards Fredrik J
Hi Fredrik,
If you want them in separate queries/tables, then you need to get the files one by one using the Get Data > From File > From Text/CSV connector.
Mynda
This is goddamn incredible
So pleased you found it helpful, Stephen! Please spread the word about Power Query 🙂
Very helpful post Mynda. Thanks for providing the detailed steps and and screenshots.
Great to hear you found it helpful, Mike!
Many thanks, Mynda!
Greetings Mynda,
Thank you so much for all your content and assistance you provide. I do have a question for you regarding the above topic. Let’s for example say you have 6-months of data collected and everything is going great; however, now you notice the dashboard is not updating anymore. After looking into the query you notice those multiple worksheets being combined through power query have all changed format slightly. Is there a way to work around this or do you need to start a new query with the newly formatted names?
Hi Ben,
If it’s just a case of names changing then you could copy the M code out of the advanced editor and do a find & replace to fix the changes, then paste it back in.
Mynda
Thank you for this tutorial. It was excellent and exactly what I needed. Other sources weren’t even close.
Pleased to hear that, Kevin!
Dear Mynda
Trust you are well, I have viewed your posts randomly be it on you tube or your blog and thank you for the effort you put into explaining the concepts. Keep it up. Regards
My pleasure, Ghulaam! Glad it was helpful 🙂
how to enable tooltips in custom column of excel power query
Ex: Excel.Workbook([Contetn])
Here as you type Excel the helper window will appear to select confortably
This is a feature available in newer versions of Excel. You’d need to upgrade Excel to get this feature.
I really do not know much about the use of power query. However, watching this video, it seems like the knowledge has been with me all along. Thanks for the very easy way you have put it down for me to understand. Great job Mynda
So pleased it was helpful!
I’m very surprised for this excellent presentation.
Glad you liked it, Joseph!
Muchas Gracias por tu enseñanza. Te escribo desde Perú.!!!
My pleasure, Luis 🙂
Thank you very much Mynda, your tutorials are excellent and you explain so well, step by step. The capabilities of Power Query you are showing are incredible. Great explanation!
Hope you are your family are very well.
Greetings from Paraguay, South America
So pleased we can help, Juan 🙂
Hi Mynda. I hope that you and yours are well in these almost surreal times.
Awesome article and clearly written. When I experience problems with PQ, they most often occur at the very beginning when I load the file, and I suspect I may not be the only one. My initial instinct has always been to expand the “content” column, and that is precisely where I usually become confused. The custom column you add eliminates that problem, but I’m not sure how or why. Do you always do it that way? Can you expand (no pun intended) on that a bit?
Thank you, we very much appreciate you! Be well and stay safe.
Thanks for your kind words, Jeff! By clicking the expand button on the content column, you’re executing the automatic merging of tables. This will only work well if all of the tables are the same format. If any are different, you end up with a mess. I wonder if that’s the cause. You’re welcome to post your question and sample files on our forum and we can take a closer look.
this succinct article would have saved me hours of pain
I have bookmarked it for future reference
Glad it’ll be of use to you, Jim 🙂
Beautifully done! Thank you.
Great to know you liked it, Chris 🙂