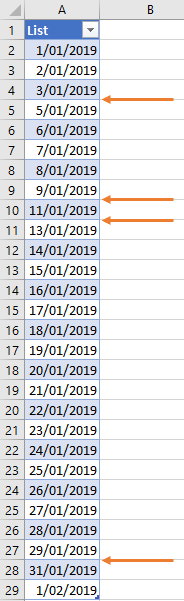
A few weeks ago, Matt asked if we could extract start and end dates with Power Query. He has a list of non-contiguous dates and wants to identify the various date ranges.
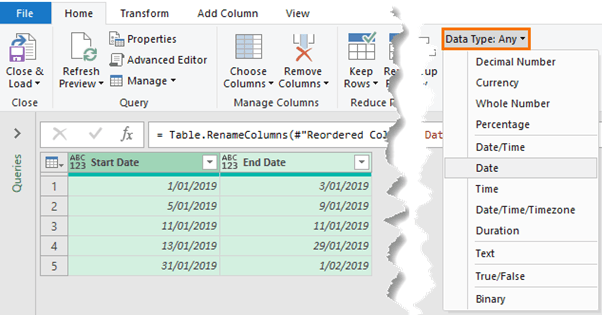
Taking the list below, you can see there are gaps indicated by the orange arrows (note, my dates are formatted dd/mm/yyyy):
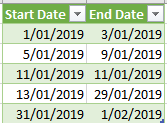
The desired result is a table containing the start and end dates as dictated by the gaps in the list above:
I’m going to cover two ways we can tackle this, one method requires few steps, but it may suffer performance issues on large tables, the other will be more efficient with bigger lists, but requires more steps. I’ll cover both in this tutorial and I’m intentionally keeping this simple for those new to Power Query. I’m sure there are more complex approaches, but I like to use the GUI where possible because it’s easier to remember.
Download Workbook
The workbook includes both query options.
Enter your email address below to download the sample workbook.
Watch the Video

Written Instructions
Method 1 - Extract Start and End Dates with Power Query
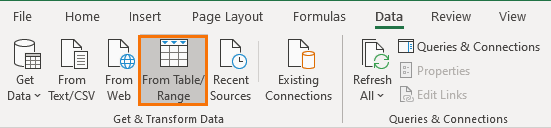
Step 1: Get data from Excel Table
Data tab > From Table

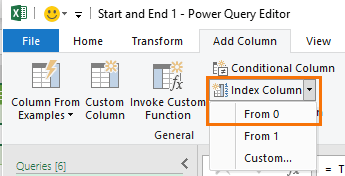
Step 2: Add Index column starting at zero
Power Query Editor Add Column tab > Index > From 0
Step 3: Add a Custom Column with a logical test
Reference the row below to check if it’s the next consecutive date:
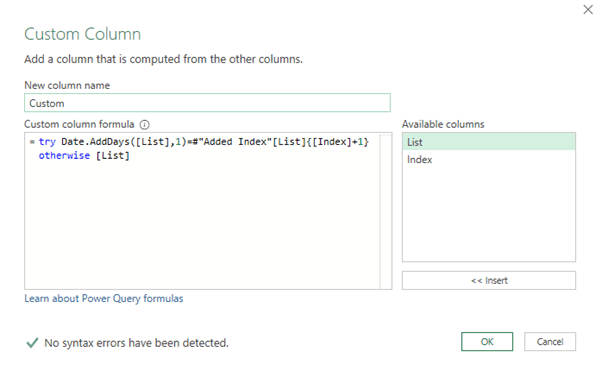
In English, this formula says; try checking to see if the date in the list column +1 is equal to the date in the List column on the current row +1, otherwise return the date from the List column.
The ‘try’ clause returns TRUE or FALSE. If the date on the next row is not 1 day after the current row’s date it will return FALSE. The ‘otherwise’ clause is used for the last date in List because there is no date after that row for the try clause to test.
Note: This referencing of rows can slow down performance over large data sets, therefore you may prefer method 2.
Step 4: Add End Date Column
Add a custom column with an if statement that extracts the date from the List column where the Custom column contains FALSE:
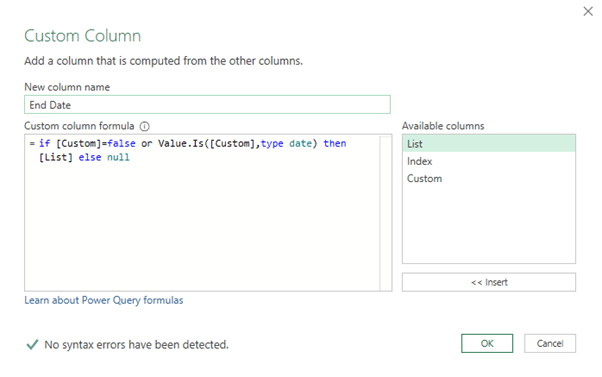
In English this formula says; if the value in the Custom column is FALSE or it’s data type is ‘date’ then return the date in the List column, else return null. We need the Value.Is function because the last row contains the final end date, so we want to include that in the End Date column.
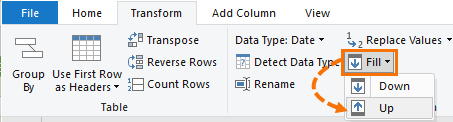
Step 5: Fill Up End Dates
Select End Date column > Transform tab > Fill Up
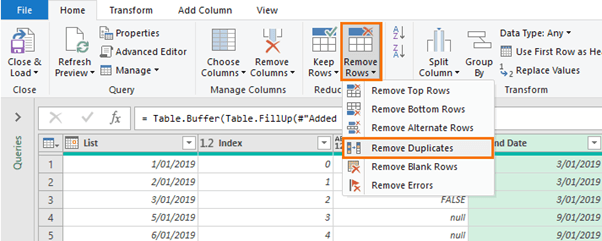
Step 6: Remove Duplicates from End Date Column
Select the End Date column > Home tab > Remove Rows > Remove Duplicates:
Step 7: Delete Index and Custom Columns
Select the column headers > press the Delete key
Step 8: Rename Columns and Change Type
Finally, rename the columns ‘Start Date’ and ‘End Date’ and set the data type to Date.
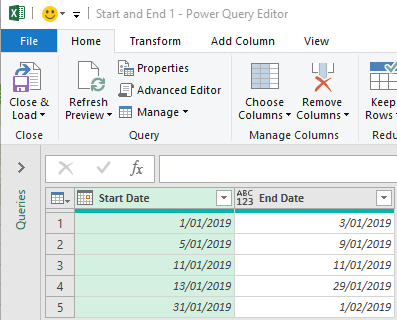
You should be left with this:
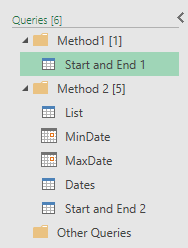
I named this query ‘Start and End Dates 1’ as it’s the first method.
Method 2 - Extract Start and End Dates with Power Query
Step 1: Get data from Excel Table
Data tab > From Table
Step 2: Find Earliest Date
Duplicate the query: right-click query name > Duplicate. Transform tab > Date > Earliest

Rename the Query: MinDate
Step 3: Repeat for the Latest Date
Repeat steps 2 and 3 to find the Max Date.
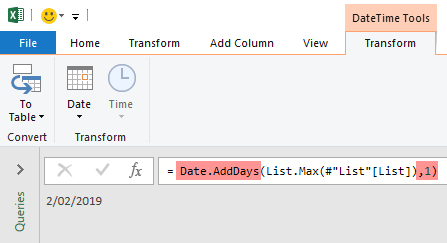
Step 4: Add a day to MaxDate
Wrap the Date.AddDays function around the List.Max formula to add a day to the Max Date:
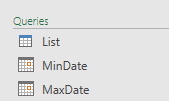
You should now have 3 queries; the original query that contains the table imported into Power Query, plus one for the MinDate and one for MaxDate:
Step 5: Generate a Consecutive List of Dates
Create a new blank query:
In the blank query create a list of the dates from Min Date to Max Date
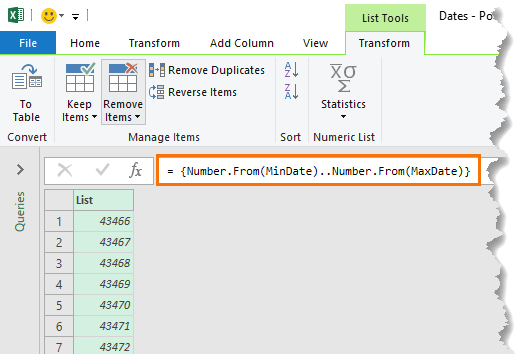
This returns a list of the date serial numbers. We’ll convert them to dates in a moment.
Step 6: Convert to Table
Convert the list of dates to a table. Transform > To Table:
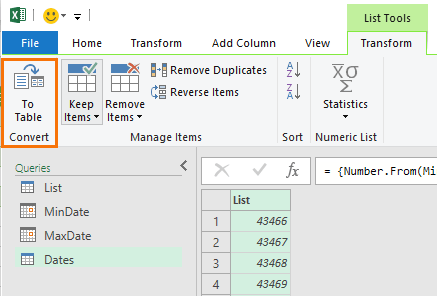
Notice you will now have a fourth query called Dates.
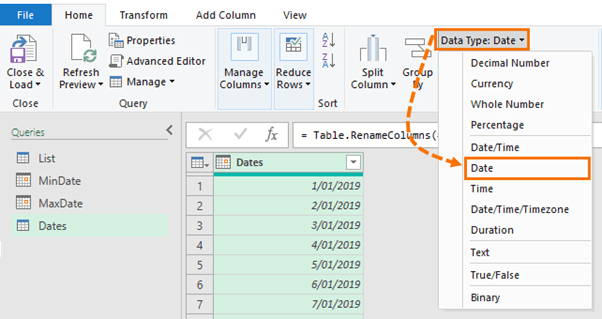
Step 7: Change Type and Rename Column
Set the data type to ‘Date’ and rename the column ‘Dates’:
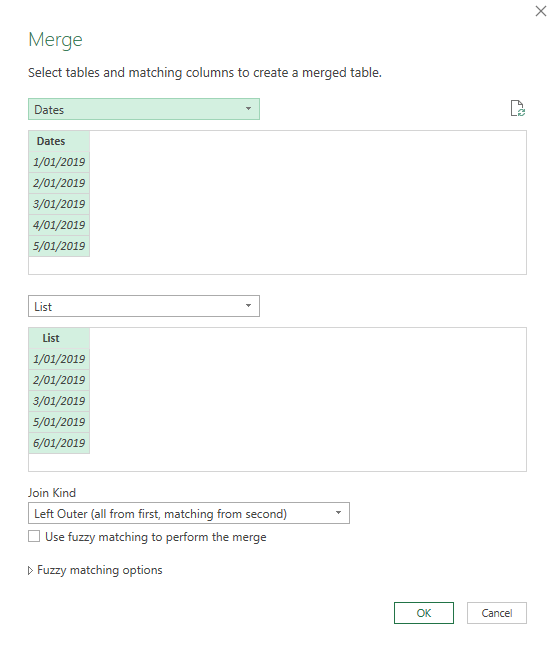
Step 8: Merge Queries
Home tab > Merge Queries > As New

This opens the Merge dialog box where you select the Dates query and the List query
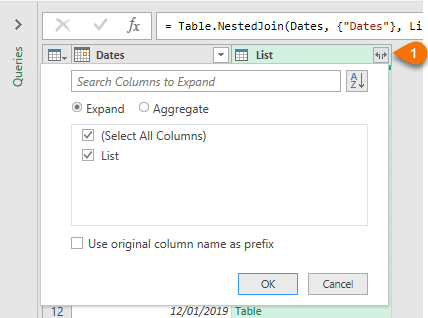
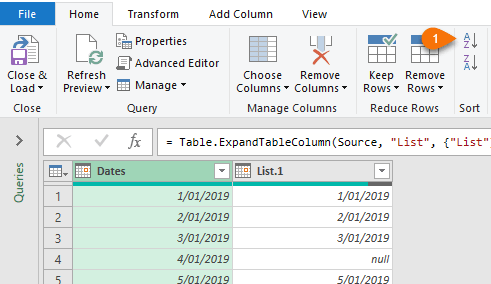
Step 9: Expand the List Table
Step 10: Sort Rows
Sort by the Dates column in ascending order
Step 11: Extract End Dates
Add a Custom Column with an if statement to extract the end dates:
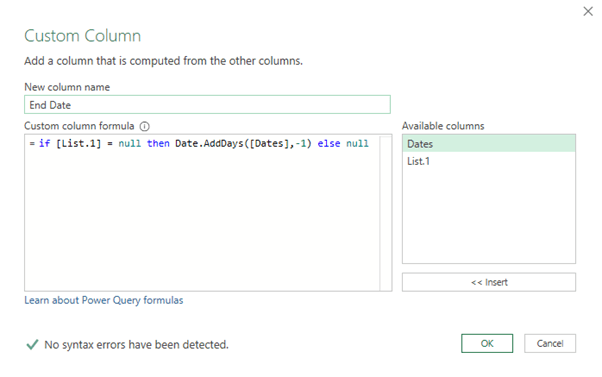
In English, the formula reads; if the value in List.1 is null then return the date from the Dates column minus 1 day, else return null.
Step 12: Fill Up the End Dates
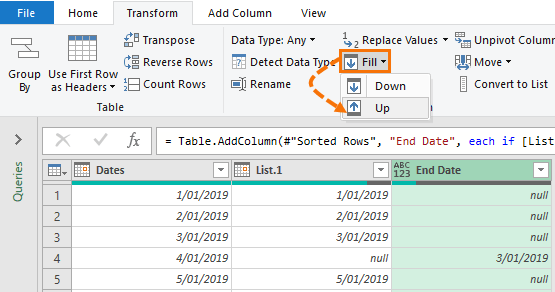
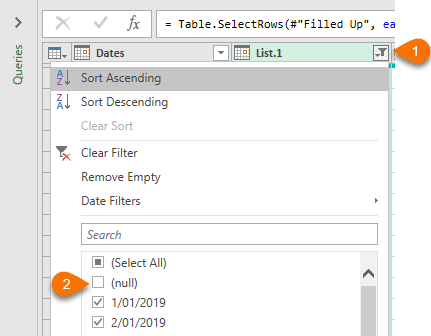
Step 13: Filter Out the null Values
Step 14: Delete List.1 Column
Select the List.1 column > press Delete
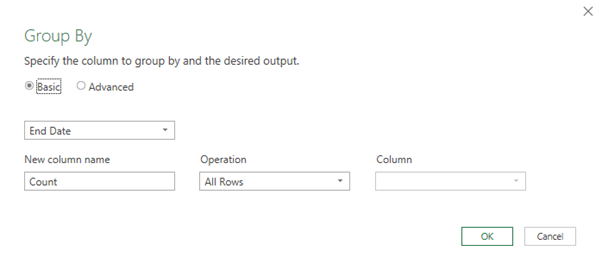
Step 15: Group the End Dates
Home tab > Group By:
Step 16: Index the Grouped Rows
Add a custom column that numbers the dates in the Count column’s tables:
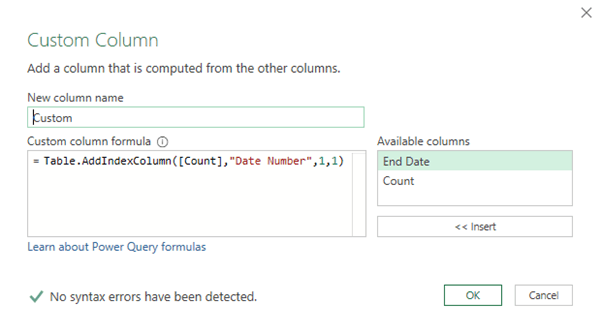
In English the formula reads; Add an index number column called “Date Number” to the tables in the Count column, starting at 1 and incrementing by 1.
Step 17: Expand the Custom Column
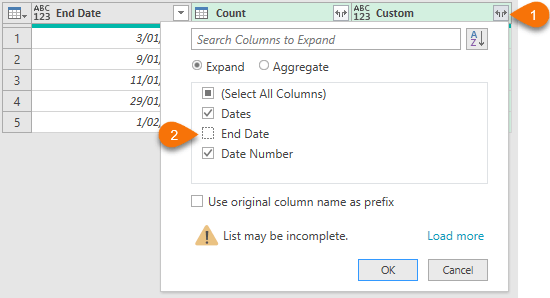
Step 18: Delete the ‘Count’ Column
Select the ‘Count’ column header and press the Delete key
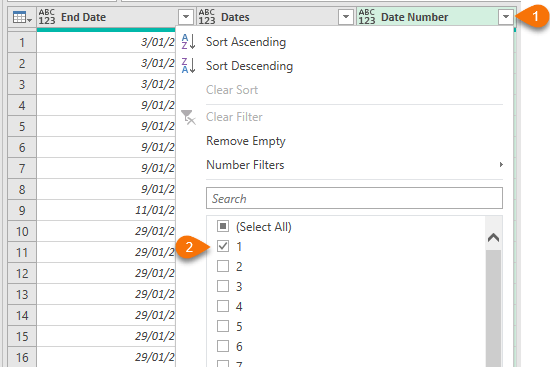
Step 19: Filter the Date Number
Retaining only date number 1:
Step 20: Reorder Columns and Rename
Rename the ‘Dates’ column to ‘Start Date’ and move to the front.
Step 21: Change Data Types
Set the Data Type for the columns to ‘Date’:
I’ve named this final query ‘Start and End Dates 2’ as it’s the second method.
In the Excel file available to download, you’ll see I’ve placed the queries into folders for Method 1 and Method 2. The ‘Other Queries’ folder is empty:
Takeaway
While method 2 has a lot of steps, when working with large data sets it’s likely to be the more efficient query. Therefore, it’s important to keep in mind that lots of steps doesn’t necessarily equal a slow query.
Thanks
A big thank you to Catalin who works with me for his contribution to method 1.
Bonjour, malgré la correction du fichier excel , j’ai un message d’erreur
Report Dates
Chargement bloqué par des échecs avec d’autres requêtes
Multi-Date Check Results
La table externe n’est pas dans le format attendu
Daniel
Hi Daniel,
Please post your question on our Excel forum where you can also upload a sample file and we can help you further.
Mynda
how to get time earliest or latest instead of date
Hi Aziz,
Duplicate the date column > select the duplicated date column > Transform tab > Date > Earliest. Repeat for Latest date.
Mynda
Hi Mynda
For step 4 of method 1, the End date formula
= if [Custom] = false or Value.Is([Custom], type date) then [List] else null
Value.Is([Custom], type date) for the last date in List is still not date, and alpha-numeric cannot change to Date for custom column (consist of True, False and the last end date), so how to make the last date return to End date column, can I use
– if [Custom] = false or ([Custom] true and [Custom] false) then [List] else null
Thank you !
Hi Chris, I’m not following sorry. Please post your question on the forum so you can share a file and I can see what you’re referring to. Mynda
Hi Mynda,
Nice tutorial but I think Method1 could be optimized.
The slow work on large data sets is because of calling value from the next row.
Instead of that we may add Index from 1 and then merge the query with itself using as a key in the first table the Index from 1 and in the second – Index from 0.
After that it is easy. Here is my code
let
Source = Excel.CurrentWorkbook(){[Name=”List”]}[Content],
#”Changed Type” = Table.TransformColumnTypes(Source,{{“List”, type date}}),
#”Added Index” = Table.AddIndexColumn(#”Changed Type”, “Index”, 0, 1),
#”Added Index1″ = Table.AddIndexColumn(#”Added Index”, “Index.1″, 1, 1),
#”Merged Queries” = Table.NestedJoin(#”Added Index1″,{“Index.1″},#”Added Index1”,{“Index”},”Added Index1″,JoinKind.LeftOuter),
#”Expanded Added Index1″ = Table.ExpandTableColumn(#”Merged Queries”, “Added Index1”, {“List”}, {“List.1″}),
#”Added Custom” = Table.AddColumn(#”Expanded Added Index1″, “Custom”, each try if Date.AddDays([List],1)=[List.1] then null else [List] otherwise [List]),
#”Filled Up” = Table.FillUp(#”Added Custom”,{“Custom”}),
#”Removed Duplicates” = Table.Distinct(#”Filled Up”, {“Custom”}),
#”Removed Columns” = Table.RemoveColumns(#”Removed Duplicates”,{“Index”, “Index.1”, “List.1″}),
#”Renamed Columns” = Table.RenameColumns(#”Removed Columns”,{{“List”, “Start date”}, {“Custom”, “End Date”}}),
#”Changed Type1″ = Table.TransformColumnTypes(#”Renamed Columns”,{{“End Date”, type date}})
in
#”Changed Type1″
P.S. As usually Bill Szysz gives a nice and clean solution
Nice, thanks for sharing, Kolyu! So many ways to achieve the same result with Power Query. I love all the different approaches.
There is nothing wrong with your methods but there is a much easier way to do it.
Check my comment below your video on YT.
Greetings :-))
Genius, Bill! Simply brilliant. Thanks for sharing 🙂 Mynda
For those interested, here is Bill’s solution:
let Source = Excel.CurrentWorkbook(){[Name="List"]}[Content], #"Changed Type" = Table.TransformColumnTypes(Source,{{"List", type date}}), #"Added Index" = Table.AddIndexColumn(#"Changed Type", "Index", 1, 1), #"Changed Type1" = Table.TransformColumnTypes(#"Added Index",{{"Index", type duration}}), #"Added Custom" = Table.AddColumn(#"Changed Type1", "Diff", each [List]-[Index]), #"Grouped Rows" = Table.Group(#"Added Custom", {"Diff"}, {{"Start Date", each List.Min([List]), type date}, {"End Date", each List.Max([List]), type date}}), #"Removed Columns" = Table.RemoveColumns(#"Grouped Rows",{"Diff"}) in #"Removed Columns"This is indeed a genius solutions and a very fast one. Used it today.
Glad it was useful, Robert!
Thank you for this tutorial. Difficult to follow the instructions in the video. But the tutorial is very handy. After reading the tutorial, the video becomes very easy to follow. Great job.
Glad you found it helpful 🙂